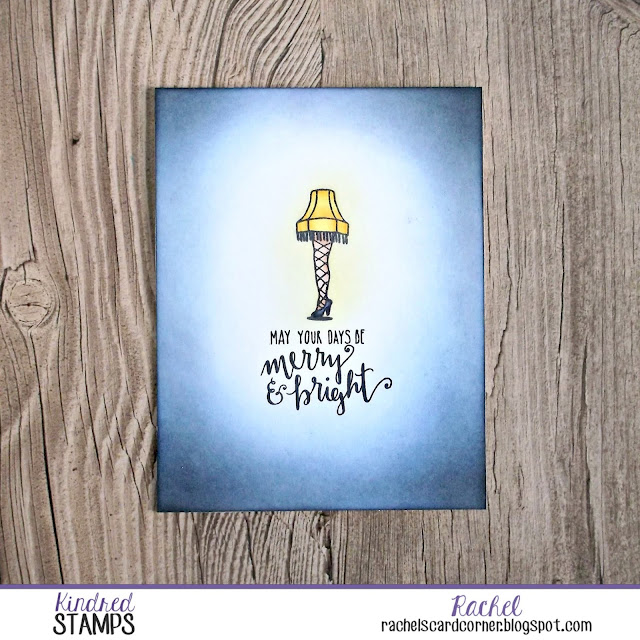
This card was super easy to create. I stamped my image onto a panel of white cardstock cut to the size of the front of an A2 card base. I masked it off and then blended some Squeezed Lemonade distress ink over the top of it to give it a glow. I then went in from the sides of the card and layered different blues to build up the color surrounding the image. I finished it off by blending a little Black Soot to the very edges to deepen the color.
I removed my masking paper and colored my lamp with my Copics. I then used my MISTI to stamp my sentiment below the image. I adhered my panel to a white top-folding A2 card base with my tape runner.
For my next card, I actually created a small photo tutorial to show you how it all came together.
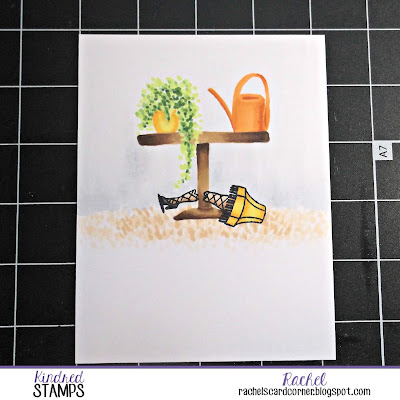
To start with, I carefully inked one side of my lamp and stamped it onto my card panel. I did the same to the other side and then stamped it a little distance away. I went back in with my Memento marker and created a jagged edge to imitate a break in the lamp.
I wanted to make it look as though the lamp was falling from a table, so I went in and sketched out my scene using a very light E marker. I then started slowly adding color to the different elements to build up the scene. I began with the green in my plant by dotting different greens to give it a leafy texture. I trailed it over the table to add some interest.
To balance the scene, I added a watering can to the other side of the table. I drew it in with a very light orange marker and then added darker color to give it dimension and flesh it out.
Now it was time to add my table. I colored the edges with the darkest color to give it depth and so that it would look round. I kept adding different shades of brown until I got the look I was going for.
Next, it was time to color my lamp and give the scene a little grounding. I added some small flicks of light E shades to make my carpet look like shag since that would have been popular during the era my scene is representing. I added a little gray shading where the carpet would meet the wall and slowly faded it out to white as it went toward the top of the scene.
All that was left was to stamp my sentiment and adhere my panel to a card base.
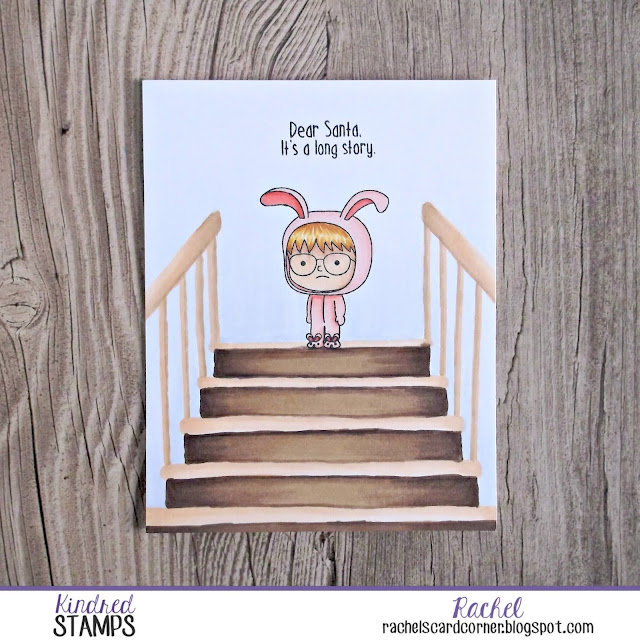
For my last card, I wanted to recreate an image I think we can all relate to.
Poor Christmas Kid has a lot of explaining to do! I stamped my kid onto a white cardstock panel and then sketched my scene in using E50 and a ruler. I then went in with gradually darker colors to add shading and depth to my stairs and the bannisters.
When my scene was the way I wanted it, I finished it off by coloring in my kid. I used my MISTI to stamp my sentiment above my scene and then adhered it to the front of a top-folding A2 white card base.
The entire Kindred Stamps September release will be available Friday, October 19 at 8am PST/11am EST. Be sure to check out the Kindred Stamps blog on Friday for the full product release as well as the complete line up of all the Kindred Stamps Design Team projects from release week! If you visit and comment on all of the designers' blogs this week, you could win $15 in Kindred Stamps shop credit! So join the Fan Club and release event, show the design team some love, and get ready to empty those wallets this Friday!
Supplies
Compensated affiliate links used when available.
Card 1
Card 2

Card 3



I love all of your projects! Thank you for the steps you used to create that scene for the broken lamp!
ReplyDeleteCute cards and
ReplyDeletethe broken lamp
card is fun!
Carla from Utah
Love love love...
ReplyDeleteThank you for the share, I need those bunny pjs
ReplyDeleteReally cute. I love the glow in the first card
ReplyDeleteGreat projects!
ReplyDeleteYou are a truly talented artist to be able to draw and color that broken lamp card! I love how you came up with the idea to break it!
ReplyDeleteThis is my FAVORITE set! you created such perfect scenes for it!
ReplyDeleteHilarious and fun cards! For the first card I really like how you used some yellow first to blend the center of the card and then blue for around it to give a light affect for the lamp! Very cool looking!
ReplyDeleteHow neat! I Love the tutorial! All 3 cards are fantastic! Thanks for sharing!
ReplyDeleteSuper awesome cards! I am so excited about this set! I just love the "Oh fudge" sentiment. Hilarious!!
ReplyDeleteAbsolutely fab!
ReplyDeleteThank you for sharing the step by step process of your coloring. Beautiful work!!
ReplyDelete