Showing posts with label WPlus9. Show all posts

Tuesday, October 30, 2018

CASology: Arithmetic

Hello! It's Tuesday and it's time for a new cue from CASology!


I had to think a little outside the box for this one because I don't really have any number stamps that would work. Instead, I decided to make a simple valentine.


I used my Calli Letters from Mama Elephant to stamp my "you" and "me" and then used my T Ruler and my Memento marker to draw my line beneath them. I then went back in with the marker and added the addition sign. I stamped the my "love" using my MISTI and some Lobster ink from Lawn Fawn.

Super easy! Thanks for stopping by today and don't forget to link up your creations on the CASology post!

Supplies
Compensated affiliate links used when available.

Tuesday, July 3, 2018

CASology: Zoom

Hello! Welcome to a brand new challenge from CASology! And since we're heading into the summer and we all seem to get extra busy at this time of year, this challenge will be running for 2 weeks.


I decided to go with a photography interpretation of the cue. You'll see it's a little different than what the other ladies on the team came up with...


I decided to use the spotlight technique to highlight my focus on the zoomed in part of the flowers. I cut and folded a card base and then used my MISTI to stamp my floral image on it. I cut a panel down to the same size as the front of the card base and then used my MISTI with the floral image still inside to stamp my panel with the floral image in the same location as on the front of the card base. 

I ran my panel through my Big Shot using my polaroid die to cut the piece that I would eventually color and layer on top of the card base. I also cut another piece with my polaroid die so my frame would remain white.

When I finished coloring my little square of flowers, I used my Multi Medium Matte to adhere it directly to the card base so that it would fit perfectly over the image that was already there "spotlighting" the portion that appears in the picture frame. I then positioned the frame around the colored piece, adhering it with a little more Multi Medium Matte.

I finished the whole thing by stamping my sentiment in Versamark and heat embossing in gold powder.

Thanks for stopping by and don't forget to add your creations to the link on the CASology post!


Saturday, May 12, 2018

Addicted to CAS Guest Designer


I'm so thrilled to be joining the Addicted to CAS team as a guest designer this week! And here's the code word...


This was perfect because I was in need of a little inspiration for this year's Mother's Day card. This gave me the perfect opportunity to pull out some of my favorite products and create something just for my Mom.


I started this card by cutting a panel to the exact size of an A2 card front - 4 1/2 inches by 5 1/2 inches. I stamped my floral image with my MISTI and then colored it in with my Copics. I adhered the panel to a card base using my glue runner. (I attached it to a card base because the Copics bled through the back and I didn't want it to show on the inside of my card.)

I cut out my Mom die cuts from white cardstock and the shadow from vellum. I used my Multi Medium Matte to adhere the white words on top of the vellum shadow cut. Then I added a little more Multi Medium Matte to the back of the vellum and adhered it to the panel. The sentiment was stamped on Slate cardstock using Versamark ink and then heat embossed with white powder. I used some foam tape to adhere the strip below my die cut sentiment.

Super simple, but the perfect card for my Mom!

Thanks for stopping by today and I hope you'll join the Addicted to CAS challenge with your own creations!


Tuesday, January 23, 2018

CASology: Late

It's that time of the week again! Time for a new cue from the CASology challenge!


I decided to go with a belated birthday card for this week's cue. I always need one or two on hand because some months are a little birthday-heavy and I may miss one along the way. Having these on hand help me to be a little less late than I would be otherwise!


This card is very simple and easy to pull together. I started by cutting and folded my card base and then running it through my Big Shot with a Next Level embossing folder. It provides a nice, subtle background for my image.

Then I stamped my image with black ink and colored it in with my Copics. I used the matching dies to cut it out. I stamped the sentiment on a strip of black cardstock in Versamark ink and then heat embossed with white embossing powder. I situated it on my card front using the rule of thirds and then added my elephant on top of it. I used foam tape for both the sentiment and the elephant.

That's it! Super simple, but super cute! Thanks for stopping by today and don't forget to add your "late" creations to our challenge!


Tuesday, January 2, 2018

CASology: Encourage

It's been a while, but I'm back with a new cue from CASology!


Before I get to the card, I wanted to share my New Year's resolution for this year. I've been letting my blog slide a little bit because the last few months of last year were insanely busy and I had to cut something out in order to not go completely crazy. My resolution going forward is to refocus on my crafting and get my blog back into some semblance of a schedule. I've found that crafting and blogging is actually helping with the "not going crazy" thing and I need to work it back into my routine in the New Year. So now that I've gotten that off my chest, here's my card for this cue!


I decided to go back to my stamping roots and create something perfectly clean and simple in a one layer simply stamped card. I'll break out my Copics in the near future, but the simplicity of this one really helped me get back into the swing of things.

All I can say is that my MISTI is seriously a lifesaver. It allowed me to line up each layer of every tiny little stamp in this card. Not to mention helping me keep the sentiment straight! Seriously, I love that little tool.

Thanks for stopping by today and I hope you'll play along with us this week!


Oh, I almost forgot to add this! The CASology challenge is currently looking for new designers to add to our team! If you love clean and simple designs and would like to join us, please click here for instructions on how to apply!


Tuesday, November 21, 2017

CASology: Cheer

Hello! It's time for a brand new cue from CASology!


It's getting to be that time of year, so I started hauling out my winter/Christmas stamps. This one from Sunny Studio is probably one of my favorites. They're perfect for the entire winter season.


I started this card by cutting a panel with a large stitched rectangle die and then using my MISTI to stamp my image and my sentiment. I also stamped my image again on some masking paper so that I could do a little ink blending over the top of it.

I covered my mug in my masking paper and then added a snowfall stencil over the top of the panel. I pressed my Versamark ink pad over the top of it and then heat embossed the falling snow in white. (I used a dry paint brush to brush away any powder that stuck to my sentiment.) I then used my ink blending tools to blend in 2 blues to create an ombre sky to help the falling snow stand out on my white card. I removed my mask and then colored my image with my copics.

I adhered my panel to a white card base and it was all finished!

I can't wait to see how you're inspired by this week's cue! Thanks for stopping by today!


Tuesday, October 24, 2017

CASology: Cherish

Hello! I'm back today with a new cue from CASology!


I looked through my stash and didn't find a sentiment that I thought really went with this cue, so I asked myself - what do I cherish? My friendships! What better way to express how much you cherish your friends than by sending a card to let them know?


I started this card by cutting and folding a navy blue card base. I used a Heidi Swapp art screen to layer on some Deco Foil transfer gel. I peeled off the screen and then let the card base dry before running it through my Mini Minc with some silver foil. What you get is this beautiful foiled constellation background. The perfect backdrop for this sentiment from WPlus9.

I tried to heat emboss my sentiment directly onto the card, but it kept getting lost in the silver background. I solved this by heat embossing my sentiment on some Vellum. It lifts the sentiment off the background just enough that you can read it without a problem. I covered the edges in Versamark ink and added more silver embossing for a little more detail.

I wrapped the vellum around the front of my card and then adhered the edges to the inside of the card base to hide the adhesive.


Thanks for stopping by today! I can't wait to see your interpretations this week!


Tuesday, October 3, 2017

CASology: Grid

Hello! I'm back today with a new cue from CASology!


I actually struggled with this one for a while before I remembered this little die that I have in my collection.


It creates the perfect little stitch lines and stitched hearts to create this adorable little heart grid. I paired it with a cute sentiment from the Biggest Fan sentiment set from WPlus9. My inside actually says "in a totally non-creepy way!" I just love the humor in it!

It was incredibly easy to pull this card together. I simply cut and folded a white card base and used the stitched line part of the die to cut those little stitches on the front. I cut the stitched hearts from four colors of cardstock and then set about gluing them on top of my stitched lines to create the grid. I used my MISTI to carefully stamp the sentiment below them to make sure it was straight and then stamped the sentiment inside. Super easy!

Thanks for stopping by today!


Thursday, August 3, 2017

The Challenge 94

Hello, everyone! It's time for a brand new inspiration photo from The Challenge!


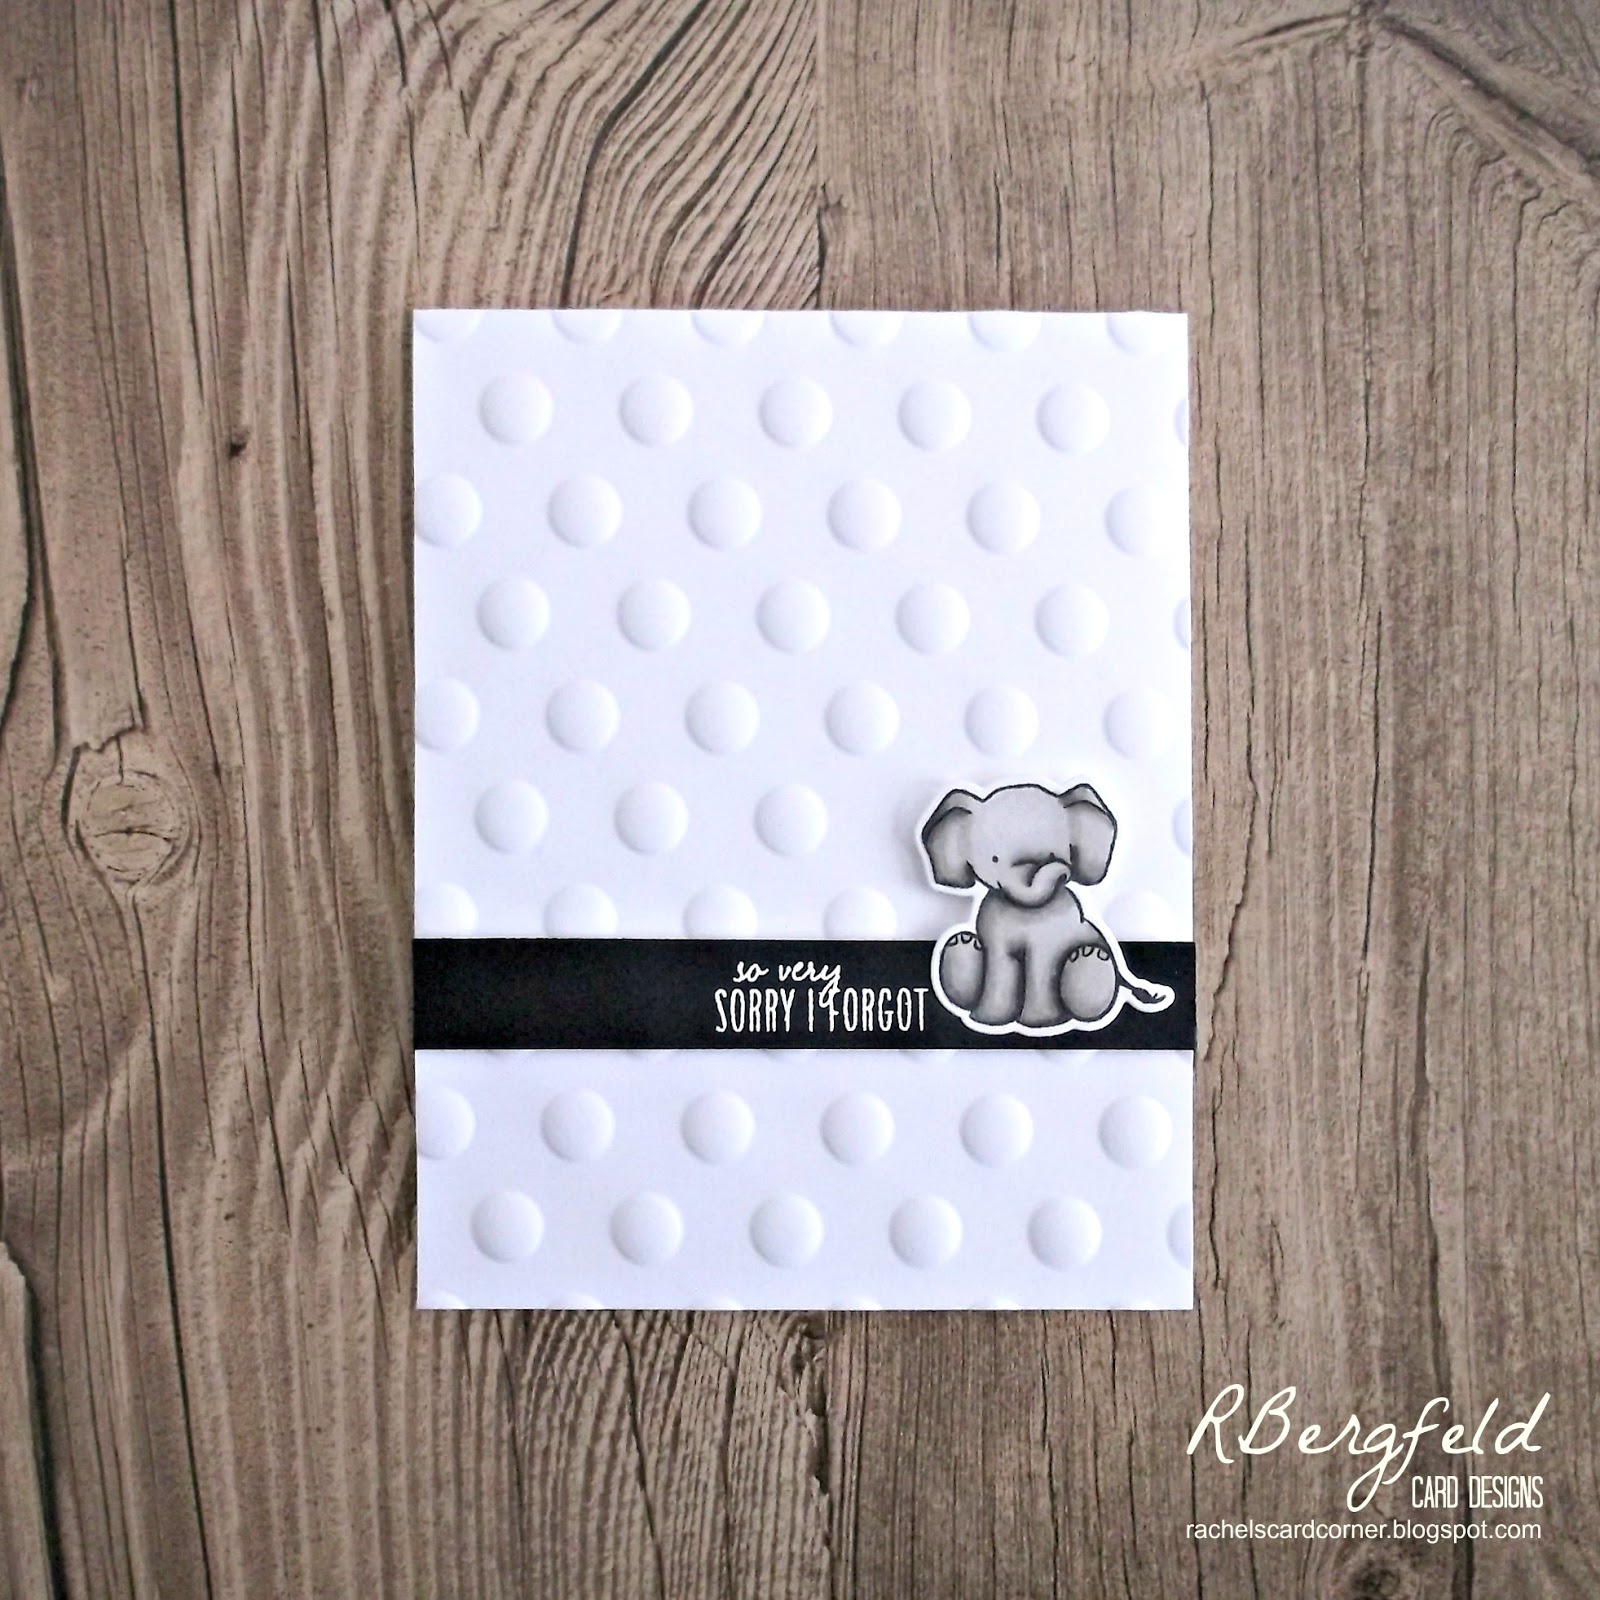
My eye was immediately drawn to those cute cupcakes, so I broke out my Sweet Shoppe set from Sunny Studio Stamps to create my own sweet treat. I decided that my cupcake looked awfully lonely, so I added a little orange soda and a candy to keep him company!


I started my card by stamping my cupcake and candy and then coloring them in with my Copics. Even though I hate fussy cutting, I did it this time because I wanted to get as close as possible to the lines as I could. I went over the white edges with a memento marker.

I cut my soda bottle from some watercolor paper and then blended in some Carved Pumpkin distress ink. I splattered water drops across it so it looked carbonated. I adhered a blue strip of cardstock over the top for the label and then stamped my heart and fussy cut it before adhering it on the label.

I stamped my sentiment on a piece of scrap pink cardstock and then heat embossed it in white powder. I clustered my images where I wanted them and then used a piece of washi tape to keep it all together while I added some foam tape to the back of them.

Meanwhile, I cut a stitched panel from some watercolor paper and then blended in some Tumbled Glass ink to the bottom right corner where my images would sit. This helps them stand out from the stark white of the paper and adds a little bit of faux dimension.

I adhered the panel to a white card base with some double-sided tape and then adhered my images on top of my ink blending using the foam tape.

To finish, I added a sprinkling of clear sequins with some multi-medium matte.

Thanks for stopping by!


Tuesday, July 11, 2017

CASology: Wish

Hello, everyone! I'm back with a new cue from CASology to play with!


I immediately thought of birthdays, but as I was going through my stash, I came across this sweet little sentiment and knew I just had to use it. I turned it into more of a Valentine's/Anniversary card.


This card is incredibly simple to make, but it's so striking with that bold, bright color behind my image. I started by cutting and folding a card base and then cutting a circle from a piece of masking paper that was the same size as my card front.

I stamped my bunnies onto my card front and then masked them off using more masking paper. I laid my negative piece from my die cut circle over the top of the card front and then blended 3 pigment inks into it to create a sunset.

I peeled off the masking from the card front and then removed the mask from my image. It leaves a perfect white image on top of a beautiful sunset. I finished it off by using my MISTI to stamp my sentiment directly under my image to ground it.

That's all! Super simple and easy to recreate! Thanks for stopping by!


Thursday, January 26, 2017

Hello

I'm playing along with the current Color Throwdown today. The colors are Green, Pink, and Aqua.


I love this new stamp from Mama Elephant! It's just such a gorgeous image and it's super fun to color! I used my Zig Brush markers for this along with a water brush to move the color around. I love how it turned out! I started by stamping my image in Versamark and heat embossing in white. I colored my images and then heat embossed my sentiment in white on black paper. I adhered my panel to a white card base with some double-sided tape to overcome the little warping I had and then added my sentiment with foam tape. I finished it off by adding a sprinkling of Sparkling Clear sequins from Pretty Pink Posh.